- June 15, 2019
- 0 Comments
- DIY, Uncategorized

I was in the basement the other day and found some paint samples from when I was deciding what color to paint my little guys nursery, ah…3 years ago. Time to do something with these samples and with Thanksgiving about a month away I decided to work on table setting ideas. I remember choosing these colors because the paint chips were so pretty and wanted to incorporate them into the plan…
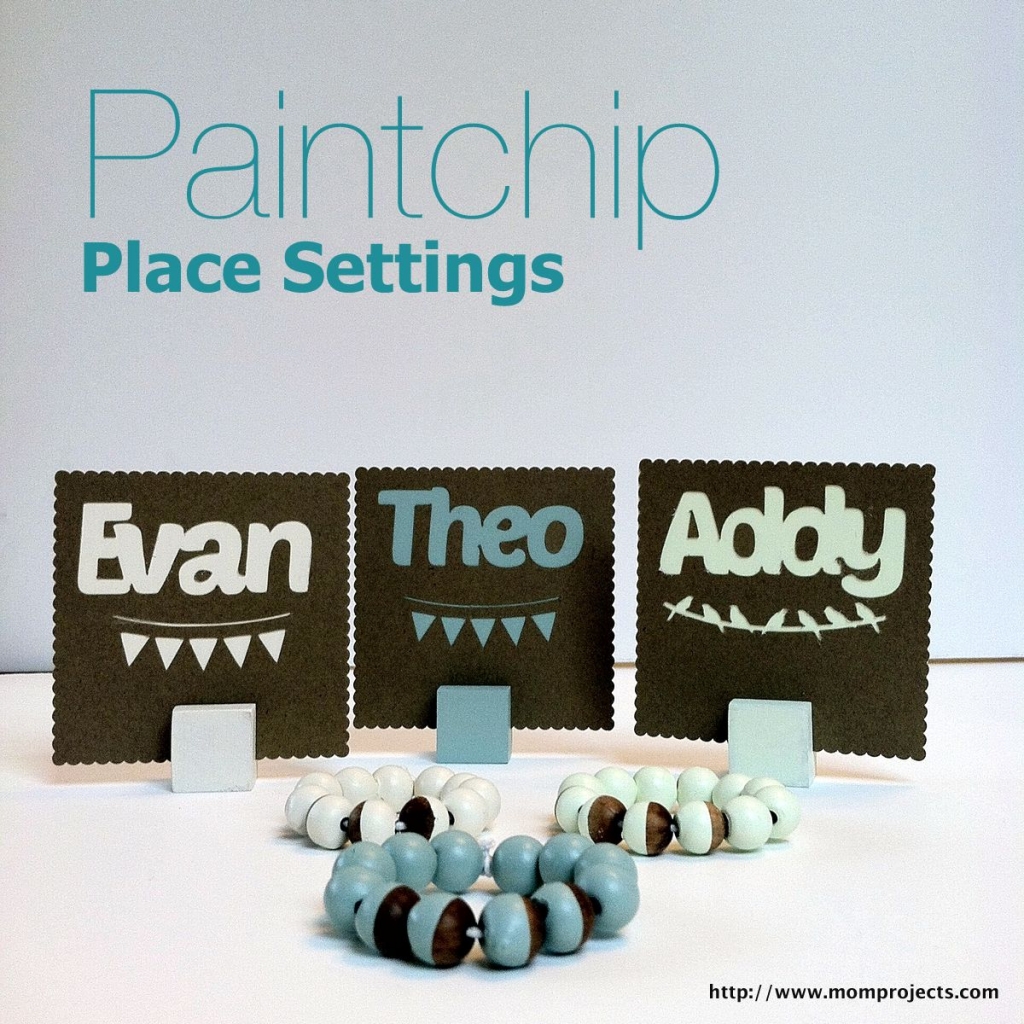
Behold Paint Chip Place Settings!

I started by running to the paint store to get paint chips to match the samples, the ones I had from 3 years ago were long gone. So far my total expense is $FREE!! Here is a list of other items you will need. They aren’t free but none of it is too pricey.
- Paper place cards with some cut out aspect (I used my silhouette cameo to make these)
- Paint Chips- The Martha Stewart ones are great because they are so big, thanks Martha!!
- Wood Blocks
- Wood Beads
- Toothpicks with that cellophane stuff at the top
- Elastic cord
- Stain
- Foam Brush (optional)
- Sandpaper
- Saw/vice
- Paint Samples
- Scissors
- Glue
- Styrofoam (a cup works great)
First- use a saw to make a small slit in the wood block, I happened to have access to a bandsaw at the time. If you are using those, I recommend pliers so you don’t get those fingers too close. If you don’t have a full workshop in your basement, cry and whine about it like I do, and then go get yourself a little handsaw and a vice. Pawn shops are famous for carrying old tools and a vice is like an extra set of really strong hands!

Prepare the beads, I used 12 wood beads per napkin ring- 8 solid and 4 dipped. While you have the paint out, use it on the wood blocks that will hold the place cards.
- Stain
- Let Dry
- Paint
- Let dry


Once they are dry, remove from the toothpicks. You may need to sand the edges as the paint tends to glob up a bit by the cellophane. It isn’t super noticeable though once they are strung together and it gives it a slightly rustic feel which I happen to like.
String them onto and elastic cord and tie tightly a double knot. Trim away the excess elastic.


Napkin rings and placecard holders are done!!
Last step, cut the pain chip to fit the paper place cards so that the color shows through the cut out spots. Use a glue stick on the placecard to stick the 2 together. Just a tip- you may want to consider laminating these if you want to use them more than once. If your dinner table is anything like mine, food is falling, drinks are spilling and paper products are about as safe as a gummy bear in the bottom of my martini!
Cheers!
Heidi

This post was featured on Sew Can Do! If you like it, you should definitely check out that site! Click on the button below.
