- June 15, 2019
- 0 Comments
- Uncategorized, DIY

When I get really excited about a project, I am like a horse with blinders. This was no exception and when I found myself standing in my closet with my bra on the outside of my shirt I knew I needed to calm down. My mom was in town and there is nothing I love more than tackling a momproject with mom. Behold the custom storage bench!
I am determined to make this old house functional so when I ran across these plans for a storage bench on Ana White’s website, www.ana-white.com I decided to take the plunge! Just a note on Ana White….she is AMAZING! If you have any interest in woodworking or just being inspired in general you have to check out her site. Ok, back to the story. There is a long skinny alcove in my room just begging to be a window seat. I wanted a bench that would serve multiple functions. The top lifts up on this one so I can toss in all sorts of things I want to hide (hubby’s bulky sweaters, hubby’s extensive book collections, hubby…just kidding!).

My mom and I set about disassembling the dusty old cosleeper that filled the space (and my son hasn’t slept in in 2 years) and went to work! If you want step by step plans either click on the link above and do a search in Ana’s extensive plan database or go straight to the source www.blueroofcabin.com. I love Mimi’s site too and can’t wait to try some more of her projects. This one was a cinch to customize, I had to make it almost twice as long so I added a support in the middle. I also chose beadboard for the inlays however you could switch it up. Some other ideas are chicken wire for a shabby chic feel, decoupaging fabric onto plywood for a funky twist or putting molding around the inside of the inlay for a more formal look. Here are a couple hints that made this easier for me and may help you as well.
1.) wood selection- I used pine. I think I would have used poplar if I did this all over again. I found out it is a bad idea to put pine through a joiner and planer due to the sap gumming up the machine. Therefore I was not able to properly mill the boards before starting. It didn’t cause the bench to be misaligned but may have been slightly easier to put together had I squared up the boards. Sorry pine…I love you but can’t have a sticky joiner!
2.) I built this quite a bit longer than the plans called for and so, for support, I cut 3 boards and kreg jigged them together in the shape of an ‘H’. the top and bottom were cut to fit the width of the inside of the bench and the middle board that connects them I cut in the height of the bench (minus the height of the top and bottom support board). Set the ‘H’ in the center of the bench and use your kreg jig to attach it (mine is way off center but still works great)
3.) It is worth the investment to throw some molding around the bottom. I saved money by not putting molding on the back. I also used a lower grade pine for the sides and the back. In retrospect I probably should have done that on the top too since there is going to be a cushion on it. Oh yea..I am making one and will post it as soon as I do!
4.) Attach the hinges and put the entire top together before attaching it to the bottom part. For some reason getting the hinges on was a little tricky and I suspect would have been a disaster if I had already put the back of the top on the base.
5.) I built the bottom part of the bench and put it in the alcove in my bedroom before attaching the top. I did this mostly because I didn’t want to carry that thing up 4 flights of stairs with the heavy top popping open. Once in place I threw on some wood glue, sat the top in place and used my nailgun to securely attach it. My mom was there with the paint roller to touch up a couple spots. Thank you mom, you always leave my house looking better than when you arrived

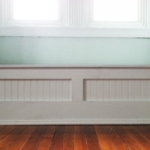
DIY Storage Bench Frame

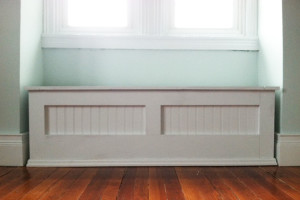
Painting Storage Bench
Next step…cushions! I’ll post more pics when I finish the cushion. I am so excited to start them I will check my wardrobe a couple times before leaving the house that day.
