- June 15, 2019
- 0 Comments
- DIY, Uncategorized

There is something about felt that brings me back to my childhood. We didn’t have a lot of money growing up so when we went to the fabric store with my mom she would let us each get a piece of felt. I have no idea what I did with mine, probably hid it from my sisters so they didn’t take it away….ahhhh the memories!

I wanted to do something with felt to decorate my mantle and recently Danish decor has been catching my eye. If you follow me on Pinterest you may already know that
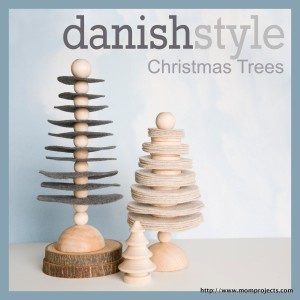
Felt..Danish Style…Holiday Mantle….enter Danish Style Christmas trees!
I could make dozen’s of these in different variations but for the sake of posting thisbefore the holidays I am going to limit myself. The tutorial is for the Gray Tree with the wood beads but I would be happy to answer questions on how to make any of these trees. Of course as I was making them about 30 other ideas popped into my head but since It was Sunday night I had to calm myself down and accept the fact that the craft stores were closed. I should mention I did include the list for wood parts to make a smaller tree like the green one in the photo. The Beige tree is similar to the Gray tree, I simply used wood discs rather than beads.
Shopping List
Note: Wood Items are all purchased through woodworks ltd. I have no affiliation with them though so by all means if you find a better deal go buy them and then let me know where! Some of these items are sold in packs so you may want to consider buying extra felt and making a few extra trees. They would be great gifts or make yourself a whole forest!
Wood Pieces for Gray Tree
- Split Ball 2 1/2″
- Round Bead 3/4″ w 3/8″ hole
- Dowel 12″ with 3/8″ diameter
- Dowel Cap 1″ with 3/8″ hole
Wood Parts for Small Tree
- Split Ball 1 1/2″
- Dowel 12″ with 1/4″ diameter
- Dowel Cap 3/4″ with 1/4″ hole
Felt- whatever color you like, you need 5 squares for a large tree
Olfa Circle Cutter for Fabric (here is a pic)

Hole punch that can go through fabric, felt, chipboard (I use this i-punch from imaginisce)

wood glue
Drill Bits 3/8″ and 1/4″
Power Drill
Saw (handsaw is fine, you just need to cut through the dowels)
Lets make the trees!
1.) Drill Holes in the split balls
In the 2 1/2 inch split balls drill a 3/8″ hole into the center about an inch or so down.
You might need someone to hold onto it while you drill, be careful!


2.) Cut Dowels To Size
Whatever height you want is good. Remember every tree is different so you can’t really mess this part up although if you could I would!

3.) Make sure your dowel fits in the hole in the split ball, that the beads slide onto it ok without being too tight, and that the dowel cap fits on snugly. If the beads are too tight you can fix this by doing one of 2 things. Sand the inside of the bead by wrapping a little sandpaper around a smaller dowel and swirling it around on the inside of the bead. You can also sand the dowel a bit just make sure you don’t make it too loose for the split ball and dowel cap.

4.) Cut your felt into circles of varying diameter. For the large tree I started by setting the olfa circle cutter to 2.5″ cutting 2 circles, moving the cutter in 1/2 centimeter-cut 2 circles, moving in another 1/2 centimeter- cut 2 circles….and so forth. This created a nice sized large tree. You can experiment, again no 2 trees are alike! Here is a Quick video tutorial on how to use an Olfa Fabric Circle Cutter. This is my first video so don’t laugh- I did it mainly so my husband has to refer to me as a ‘Vlogger’.

5.) place the dowel in the hole with a little wood glue, slide 2 beads on for the trunk.

6.) Use the hole punch to put a hole in the exact center of each felt circle. I folded it into quarters and then just punched the corner off. This ensured I would be right in the center!

7.) Alternate Felt Circle with a bead starting with the largest felt circle’s first.

8.) Put a dab of wood glue in the dowel cap and pop that sucker on top!
Congratulations, you just made a Danish style Christmas tree!
Glædelig jul!!
Heidi
This post was featured on two it yourself link it or lump it link Party!


alderberryhill Igottacreate thewellcraftedhome thediydreamer sewcando
motivatememondayblockparty boogieboardcottage funkypolkadotgiraffe coastalcharm
notjustahousewife sugarbeecrafts salttree myuncommonsliceofsuburbia
lifewithmoorebabies allthingsthursdaybloghop
pincentivebloghop the 36thavenue thecraftyblogstalker nominimalisthere thehappyhousie
romantichome frenchcountrycottage common ground myplaceoftaste twoityourself
homecoming watchoutmartha persialou Dreamalittlebigger livingbettertogether